本文共 8480 字,大约阅读时间需要 28 分钟。
文章目录
(1)管道是什么
管道是UNIX中一种古老的通信方式,管道本质其实是一个文件
 如上,命令行who的标准输出原本是屏幕,但是却输出到了管道文件中,发生了重定向,然后wc命令再从以管道文件作为标准输入,然后输出到屏幕中 其中
who | wc -l这种属于匿名管道 (2)匿名管道
A:读端和写端
从who | wc -l可以看出,who作为一个进程是把内容写入管道文件,使用的是管道的写端,wc从管道中读入数据,使用的是管道的读端。
所以下面是父进程创建了管道
 接着父进程创建子进程
  可以发现此时父子进程可以同时对管道进行写入的和读取,但是管道只能一端写入一端读入,所以要进行调整
B:建立匿名管道的函数
pipe函数用于建立匿名管道,其头文件是unistd.h
int pipe(int fd[2]),其中fd是一个有两个元素fd[0],fd[1]的数组,传入函数pipe后在其内部分别以读写的方式打开管道文件,默认情况下,fd[0]和fd[1]会分别获得文件描述符,其中fd[0]表示读端,fd[1]表示写端 模拟实现一下pipe函数可能就是下面这样的
 有很多同学在这里会感到疑惑,因为用于进程间通信的管道文件就只有一个,为什么会有两个文件描述符呢?(默认是3和4)
 其实这一点在之前的基础IO中我没有表示特别清楚,以读方式的打开一个文件,会分配一个描述符(假设是3),然后再以写方式打开刚才的你文件也会分配一个描述符(假设是4),这里的3和4操作的是一个文件,只不过一个负责读,一个负责写
比如下面这个例子就可以说明这个情况

C:最简单的进程间通信-演示
这里我们可以根据上面读端和写端的那个流程,首先调用pipe函数,接着创建子进程
 现在的场景就是这样 接着,我们让子进程写入数据到管道,父进程从管道读取数据。于是关闭子进程的读端也即是
fd[0],关闭父进程的写端也就是fd[1] 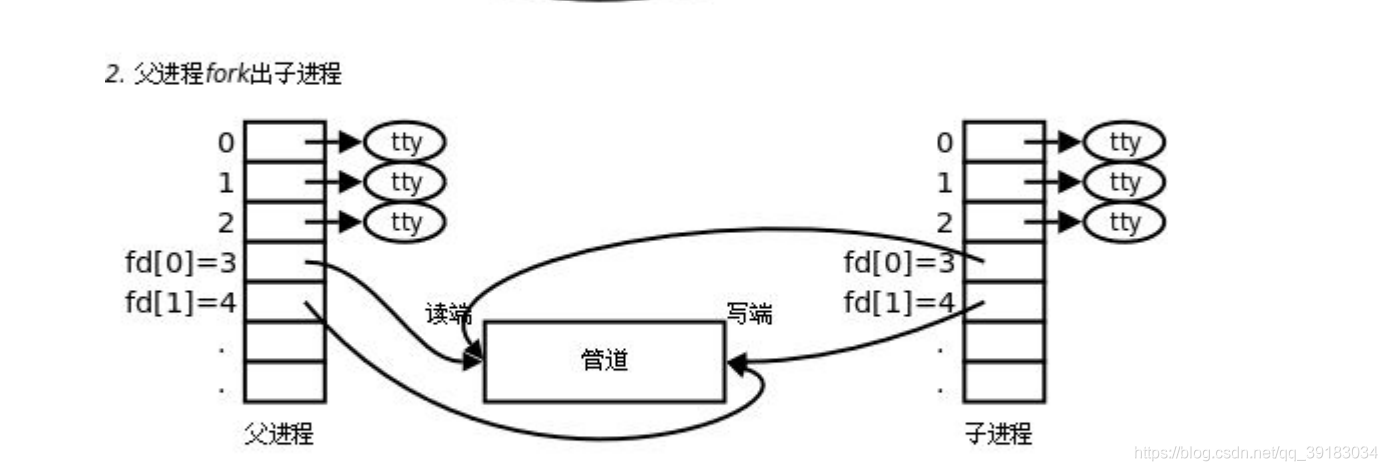
还有一点十分重要:文件描述符数组(pipefd)是创建子进程之前就有的,而且调用pipe函数之后,数组内容就没有改变过,所以不发生写时拷贝,所以数组是父子进程共有的。但是files struct是父子进程各自拥有的,对子进程来说close(fd[0]),就相当于抹杀了子进程对该文件的读权限
 为了观察方便,对父子进程都是用死循环。子进程每隔一秒读入一段信息
this is the data that the child process wrote用来证明子进程写入了数据;对于父进程则取读取数据,一旦读完数据,就输出the father process got the information,用来证明父进程读取到了数据 #include#include #include #include int main(){ int pipefd[2]={ 0}; pipe(pipefd); pid_t id=fork(); if(id==0)//child { close(pipefd[0]); const char* msg="This is the data that the child process wrote"; while(1) { write(pipefd[1],msg,strlen(msg)); sleep(1); } } else//father { close(pipefd[1]); char buffer[64]; while(1) { ssize_t ret=read(pipefd[0],buffer,sizeof(buffer)-1); if(ret>0)//判断是否读到 { buffer[ret]='\0';//加上结束标志,便于输出 printf("The father process got the information:%s\n",buffer); } } } return 0;}
效果如下,这样就完成了一个最简单的进程间通信

D:管道四大特性
特性一:如果写端(这里是子进程)不关闭文件描述符,且不写入(简称为读端条件不就绪),那么读端可能会长时间阻塞(当管道有历史数据时会先读完,管道为空,且写端不写入会长时间堵塞),也就是读端快,写端慢
比如,将上面例子中,子进程的睡眠由1秒提升至5秒,就会发现虽然父进程在死循环且没有睡眠的情况下,也会和子进程同步
 特性二:当写端在写入时,写端条件不就绪(比如管道已经满了),写端就要被阻塞,也就是写端快,读端慢
 比如,修改上面的例子如下,在子进程中使用cout查看子进程写入管道的次数,然后父进程每隔1s读取一次
#include#include #include #include int main(){ int pipefd[2]={ 0}; pipe(pipefd); pid_t id=fork(); if(id==0)//child { close(pipefd[0]); const char* msg="This is the data that the child process wrote"; int cout=0;//统计次数 while(1) { write(pipefd[1],msg,strlen(msg)); printf("The number of times the child process writes:%d\n",cout++); } } else//father { close(pipefd[1]); char buffer[64]; while(1) { ssize_t ret=read(pipefd[0],buffer,sizeof(buffer)-1); if(ret>0) { buffer[ret]='\0'; printf("The father process got the information:%s\n",buffer); sleep(1); } } } return 0;}
效果如下,写端瞬间将管道充满,然后读端慢慢的从管道中读数据

特性三:如果写端关闭文件描述符,那么读端当读完管道内容后,或读到文件结尾(此时read的返回值是0)
如下,当子进程读入上次后,关闭子进程的写端,跳出循环退出子进程,父进程仍旧每秒从管道中读取数据一次,并且输出read接口的返回值
#include#include #include #include #include int main(){ int pipefd[2]={ 0}; pipe(pipefd); pid_t id=fork(); if(id==0)//child { close(pipefd[0]); const char* msg="This is the data that the child process wrote"; int cout=0; while(1) { write(pipefd[1],msg,strlen(msg)); printf("The number of times the child process writes:%d\n",cout++); if(cout==10) { close(pipefd[1]);//读10次后关闭写端 break; } } exit(2); } else//father { close(pipefd[1]); char buffer[64]; while(1) { ssize_t ret=read(pipefd[0],buffer,sizeof(buffer)-1); if(ret>0) { buffer[ret]='\0'; printf("The father process got the information:%s\n",buffer); sleep(1); } printf("the father process read the end of file which the return value of 'read' is %ld\n",ret);//read接口的返回值 } } return 0;}

 对比特性一,特性一中是写端不关闭文件描述符还写的特别慢,因此读端也被牵制住,造成读端堵塞。而当写端文件描述符关闭之后,这个管道文件唯一的输入来源就切断了,因此如果不给其结束标记,那么就会造成读端永久阻塞
 特性四:如果读端关闭文件描述符,那么写端有可能被操作系统结束掉
如下,让子进程不断写入数据,让父进程读取5次数据后,就关闭读端,使用如下脚本观察进程
while :; do ps axj | grep test.exe | grep -v grep; echo "#######################";sleep 1;done
#include#include #include #include #include int main(){ int pipefd[2]={ 0}; pipe(pipefd); pid_t id=fork(); if(id==0)//child { close(pipefd[0]); const char* msg="This is the data that the child process wrote"; int cout=0; while(1) { write(pipefd[1],msg,strlen(msg)); printf("The number of times the child process writes:%d\n",cout++); } } else//father { close(pipefd[1]); char buffer[64]; int cout=0; while(1) { ssize_t ret=read(pipefd[0],buffer,sizeof(buffer)-1); if(ret>0) { buffer[ret]='\0'; printf("The father process got the information:%s\n",buffer); sleep(1); cout++; } if(cout==5) { close(pipefd[0]);//读5次后就关闭读端 } } } return 0;}
可以很明显当父进程读5次后,子进程退出,变为了僵尸状态
 当读端关闭之后,就没有进程读取数据了,那么写入的操作就变成了一种无用操作,所以操作系统发现了这种浪费资源的行为后,就发送了13号信号,结束了子进程
  根据前面的进程等待的知识,我们也可以获取退出信号,正是
SIGPIPE 
E:管道的特点
- 只能用于具有共同祖先的进程(具有亲缘关系的进程)之间进行通信。通常,一个管道由一个进程创建,然后该进程调用fork,此后父子进程之间就可使用该管道
- 管道提供流式服务。所谓流式服务就是读端在读取时可以任意读取,想读多少就读多少,就像水龙头一样,你想开多大完全取决于你
- 一般而言,进程退出,管道释放,所以管道的生命周期跟随进程
- 由特性1,2可知,管道之间具有同步和互斥的机制
- 管道是半双工的,数据只能向一个方向流动
F:从内核角度理解管道
Linux下一切皆文件
 如下便是进程打开的文件的file结构体,其中有一个结构体path
  跳转过去,其中的dentry表示该file所在的目录结构体
  跳转过去,当找到其所在的目录后,其结构体内就存储了目录的inode
  根据目录的inode可以找到目录的数据块,而之前说过目录中存储的就是文件名和inodei·映射关系,于是就可找到该文件file的inode,如下
  而inode中有一个union,它是迎来标识文件类型的,可以发现第一个便是管道文件
G:管道总结
至此我们便可以从更深的层次中理解管道的本质。sleep 1000 | sleep 2000,分别是两个进程,它们的父进程均是bash,所以bash创建了管道,然后关闭了它对管道的通信,这两个sleep命令则利用管道进行通信

who | wc -l,bash创建了管道,who和wc利用管道通信,who发生输出了重定向,将输出重定向的管道文件中,wc发生了输入重定向,将输入来源从键盘更改为管道文件,Linux一切皆文件,这就管道的本质 (3)命名管道
A:命名管道和匿名管道的区别
前面说过,匿名管道的限制就是只能在具有共同祖先(具有亲缘关系)的进程间通信,而不适合与毫无相干的两个进程
如果我们想在两个不相干的进程之间进行通信,可以使用FIFO文件完成,也被称为命名管道,命名管道实际是一种类型为“p”的文件
B:如何创建命名管道
匿名管道由pipe函数创建并打开,命名管道则有mkfifo函数创建
mkfifo filename
也可以从程序中创建,其函数原型为
int mkfifo(const char* filename,modet_t mode);//filename是创建管道文件的路径+文件名//mode是权限值
C:演示-管道实现服务端和客户端的通信
如下我将虚拟机中的centos系统作为服务端,在其上创建一个文件叫做server.c,服务端用来读取数据。
client.c。这就像xshell是QQ窗口,我像Linux主机,也就是腾讯服务器发送消息,然后服务端回传回来。虽然不是特别准确,但是足以说明命名管道在·的作用 Makefile如下
.PHONY:allall:client.exe server.exe client.exe:client.c gcc -o $@ $^server.exe:server.c gcc -o $@ $^.PHONY:cleanclean: rm client.exe server.exe fifo

#include#include #include #include int main(){ umask(0);//屏蔽命令行umask干扰 if(mkfifo("./fifo",0666)==-1)//如果mkfifo返回值是-1,创建失败 { perror("打开失败"); return 1; } int fd=open("fifo",O_RDONLY);//服务端以只读的方式打开管道文件 if(fd>=0) { char buffer[64]; while(1) { printf("客户端正在接受消息\n"); printf("############################\n"); ssize_t ret=read(fd,buffer,sizeof(buffer)-1); if(ret>0) { buffer[ret]='\0'; printf("服务端接受到客户端消息:%s\n",buffer); } else if(ret==0)//如果客户端退出,将会读到文件结束,所以服务端也要退出 { printf("客户端已经下线,服务端下线\n"); break; } else { perror("读取失败\n"); break; } } }}
在客户端则直接打开管道文件,然后写入数据
#include#include #include #include #include int main(){ int fd=open("fifo",O_WRONLY);//直接打开管道文件 if(fd>=0) { char buffer[64];//从键盘读入数据到这个缓冲区 while(1) { printf("客户端-请输入消息:"); ssize_t ret=read(0,buffer,sizeof(buffer)-1);//从键盘读入数据 if(ret>0) { buffer[ret]='\0'; write(fd,buffer,ret);//读入ret个数据就向管道中写入ret个数据 } } }}
现在,在虚拟机中运行服务端,然后在xshell中运行客户端,然后客户端输入数据,服务端就会接受到,客户端下线,服务端也会下线

这里还有一个非常有趣的点:那个fifo文件是0个字节,自始至终它都是一个字节
 这表明它们之间通信时,并没有直接在这个文件上进行IO操作,因为如果进行IO操作其实代价就太大了。这里的fifo其实仅仅起到了一种标志的作用,它的底层其实和匿名管道是差不多的
 上面演示的是调用系统调用接口mkfifo进行操作,而mkfifo其实也是一个命令,也就是直接可以创建管道完成通信
 然后在客户端输入一段脚本,将一段文字不断输入到管道中,接着在服务端不断读取
 while :; do echo "this is client";sleep 1;done > pipe

转载地址:http://yisi.baihongyu.com/